Tuesday, 15 January 2013

FileUpload with Asyncfileupload and JQuery without refreshing page.


FileUpload with Asyncfileupload and JQuery without refreshing page.


.aspx
<%@ Page Language="C#" AutoEventWireup="true" CodeFile="Default.aspx.cs" Inherits="_Default" %>

<%@ Register Assembly="AjaxControlToolkit" Namespace="AjaxControlToolkit" TagPrefix="cc1" %>
<!DOCTYPE html PUBLIC "-//W3C//DTD XHTML 1.0 Transitional//EN" "http://www.w3.org/TR/xhtml1/DTD/xhtml1-transitional.dtd">
<html xmlns="http://www.w3.org/1999/xhtml">
<head runat="server">
    <title></title>

    <script src="jquery.min.js" type="text/javascript"></script>
    <script type="text/javascript">
        function uploadStarted() {
            $get("imgDisplay").style.display = "none";
        }
        function uploadComplete(sender, args) {
            var imgDisplay = $get("imgDisplay");
            imgDisplay.src = "images/loader.gif";
            imgDisplay.style.cssText = "";
            var img = new Image();
            img.onload = function() {

            };
            img.src = "<%=ResolveUrl(UploadFolderPath) %>" + args.get_fileName(); ;
            //alert(img.src);
            $('#UploadedImage').append('<img src=' + img.src + ' style="height:100px;width:100px;">');

        }
    </script>

    <style type="text/css" >
        .FileUploadClass
        {
            width: 33px;
            height: 22px;
            background: url('browse-icon.jpg') 0 0 no-repeat;
            display: block;
            overflow: hidden;
            cursor: pointer;
        }
        .FileUploadClass input[type=file]
        {
            cursor: pointer;
            position: relative;
            height: 100%;
            width: auto;
            opacity: 0;
            -moz-opacity: 0;
            filter: progid:DXImageTransform.Microsoft.Alpha(opacity=0);
        }
    </style>
</head>
<body>
    <form id="form1" runat="server">
    <asp:ScriptManager ID="ScriptManager1" runat="server">
    </asp:ScriptManager>
    <cc1:asyncfileupload cssclass="FileUploadClass" onclientuploadcomplete="uploadComplete"
        runat="server" id="AsyncFileUpload1" onuploadedcomplete="FileUploadComplete"
        width="20px" height="26px" style="cursor: pointer;" onclientuploadstarted="uploadStarted" />
    <br />
    <img id="imgDisplay" alt="" src="" style="cursor: pointer; display: none" />
    <div id="UploadedImage">
    </div>
    </form>
</body>
</html>

.cs Page
protected string UploadFolderPath = "~/";
protected void FileUploadComplete(object sender, EventArgs e)
    {
        string filename = System.IO.Path.GetFileName(AsyncFileUpload1.FileName);
        AsyncFileUpload1.SaveAs(Server.MapPath(this.UploadFolderPath) + filename);
    }

Click Download For Sample Code.

Wednesday, 2 January 2013

Install windows service using command prompt


Start --> All Programs --> Microsoft Visual Studio 2008 --> Visual Studio Tools --> Open Visual Studio Command Prompt


After open command prompt point to your windowsservice.exe file in your project
Initially in our command prompt we are able to see path like this

C:\Program Files\ Microsoft Visual Studio 9.0\VC > 

This path is relating to our visual studio installation path because during installation if you give different path this path should be different now we can move to folder which contains our windowsservice.exe file. After moving to exe file exists path my command prompt like this


After moving to our windowsservice.exe contains folder now type 

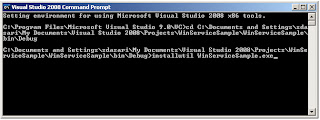
Installutil windowsservicesample.exe (Give your windows service exe file name) and now press enter button.

After type Installutil windowsservicesample.exe file that would be like this


After that the service will install successfully in your system.

Now I have question do you have idea on how to see installed windows services and how to start our windows service if you have idea good otherwise no need to panic just follow below steps

Start --> Control Panel --> Open Control Panel --> Select Administrative Tools --> Computer Management --> Services and Applications --> Services --> Open services

Now check for your windows service name and right click on that and select option start your windows service has started successfully 


If we want to uninstall the installed windows service you just point to your service same as what I explained previously and type statement installutil /u and your service name
Installutil /u windowsservicesample.exe

Windows Service in c#


Creating Windows Service is very easy with visual studio just follow the below steps to create windows service
Open visual studio --> Select File --> New -->Project--> select Windows Service
And give name as WinServiceSample


After give WinServiceSample name click ok button after create our project that should like this


In Solution explorer select Service1.cs file and change Service1.cs name to ScheduledService.cs because in this project I am using this name if you want to use another name for your service you should give your required name.

After change name of service open ScheduledService.cs in design view right click and select Properties now one window will open in that change Name value to ScheduledService and change ServiceName to ScheduledService. Check below properties window that should be like this


After change Name and ServiceName properties again open ScheduledService.cs in design view and right click on it to Add Installer files to our application.

The main purpose of using Windows Installer is an installation and configuration service provided with Windows. The installer service enables customers to provide better corporate deployment and provides a standard format for component management.

After click on Add installer a designer screen added to project with 2 controls: serviceProcessInstaller1 and ServiceInstaller1

Now right click on serviceProcessInstaller1 and select properties in that change Account to LocalSystem


After set those properties now right click on ServiceInstaller1 and change following StartType property to Automatic and give proper name for DisplayName property


After completion of setting all the properties now we need to write the code to run the windows services at scheduled intervals.

If you observe our project structure that contains Program.cs file that file contains Main() method otherwise write the Main() method like this in Program.cs file

/// <summary>
/// The main entry point for the application.
/// </summary>
static void Main()
{
ServiceBase[] ServicesToRun;
ServicesToRun = new ServiceBase[]
{
new ScheduledService()
};
ServiceBase.Run(ServicesToRun);
}


After completion of adding Main() method open ScheduledService.cs file and add following namespaces in codebehind of ScheduledService.cs file
using System.IO;
using System.Timers;

If you observe code behind file you will find two methods those are

protected override void OnStart(string[] args)
{
}

protected override void OnStop()
{
}
We will write entire code in these two methods to start and stop the windows service. Write the following code in code behind to run service in scheduled intervals
 
//Initialize the timer
Timer timer = new Timer();
public ScheduledService()
{
InitializeComponent();
}
//This method is used to raise event during start of service
protected override void OnStart(string[] args)
{
//add this line to text file during start of service
TraceService("start service");

//handle Elapsed event
timer.Elapsed += new ElapsedEventHandler(OnElapsedTime);

//This statement is used to set interval to 1 minute (= 60,000 milliseconds)

timer.Interval = 60000;

//enabling the timer
timer.Enabled = true;
}
//This method is used to stop the service
protected override void OnStop()
{
timer.Enabled = false;
TraceService("stopping service");
}
private void OnElapsedTime(object source, ElapsedEventArgs e)
{
TraceService("Another entry at "+DateTime.Now);
}
private void TraceService(string content)
{

//set up a filestream
FileStream fs = new FileStream(@"d:\ScheduledService.txt",FileMode.OpenOrCreate, FileAccess.Write);

//set up a streamwriter for adding text
StreamWriter sw = new StreamWriter(fs);

//find the end of the underlying filestream
sw.BaseStream.Seek(0, SeekOrigin.End);

//add the text
sw.WriteLine(content);
//add the text to the underlying filestream

sw.Flush();
//close the writer
sw.Close();
}

If you observe above code in OnStart method I written event ElapsedEventHandler this event is used to run the windows service for every one minute

After completion code writing build the application and install windows service. To install windows service check this post here I explained clearly how to install windows service and how to start windows service.

Now the service is installed. To start and stop the service, go to Control Panel --> Administrative Tools --> Services.  Right click the service and select Start. 

Now the service is started, and you will be able to see entries in the log file we defined in the code.

Click Download for Sample Code.